Introduction · Menu Bar · Group Browser · Text Editor · External URL · Object Editor ·
Layer Editor · Shortcuts
User’s View of the HyperImage Editor
From the user’s point of view the HyperImage system consists of two elements: The Editor and the Reader. With the HyperImage Editor you can link digital images, text and mixed media documents. What’s special about this is that single-click hyperlink references can be made between images or regions within images or even individual pixels.
The HyperImage Editor is a server-based software environment in which an author or multiple authors are working on a joint project of images. The project is then exported from the editor in the form of a digital publication. Since the editor is a Java WebStart application it will run on all modern operating systems (any system that supports Java). Access to the data is only available to authorized users of a project after login. Users may export their data and research results at any time from the protected Editor environment for further processing or publication.
- Import: Import of binary files (e. g. digital images) as well as associated metadata from external repositories.
- Group Browser: Creation of groups and associated metadata. Add, sort and delete objects, views, layers, inscriptions, texts, hyperlinks and light tables in groups.
- Object Editor: Edit objects and associated metadata.
- Layer Editor: Create layers by marking image regions, edit layer metadata and link layers to other elements of a HyperImage project.
- Project Text Editor: Edit project texts.
- Search: Search project contents.
- Admin Settings: Administration of individual project settings, such as the language used in the project.
- Light Table Editor: Add project specific light tables that were created using the HyperImage Reader.
- Export: Works created with the editor are exported for further processing or publication (e.g. using the HyperImage Reader) in a project-specific exchange format (PeTAL/XML).
Technical View of the HyperImage Editor
The HyperImage Authoring System is a web-based system. It consists of three main components – Server, Connector and Database – all being utilized by a graphical front-end (the HyperImage Editor). Data between the Editor and the HI Server is exchanged in a standardized format using SOAP/HTTP.
HyperImage Server
The Server component is deployed as a web service on a Glassfish application server. It supports intelligent caching strategies to lessen the network load and database access and provides a robust and flexible object model for your data.
HyperImage Connector
External image repositories can be integrated into the HyperImage authoring system via the Connector component. There is currently support for Fedora 3 Repositories (Flexible Extensible Digital Object and Repository Architecture, www.fedora.info) via a proof-of-concept connector.
HyperImage Database
The Open Source database system PostgreSQL was choosen as the Database component of HyperImage. The import of binary and source metadata from repositories into the HyperImage database occurs via a defined WSDL interface (HyperImage Connector) using the Glassfish application server.
All project data can be exported for further processing or publication (e.g. using the HyperImage Reader) in a project specific XML schema. We will create further connectors / interfaces to other image repositories which will also synchronize copyright information between the source repository and HyperImage.
HyperImage 2 is freely available as open source software under the SUN CDDL 1.0 (www.sun.com) to all interested parties. The source code as well as a detailed software design description (SDD) is available via our community platform on SourceForge.
http://hyperimage.sourceforge.net/
Getting Started
Firstly, download the HyperImage Editor from http://hyperimage.sourceforge.net/. The HyperImage Editor is based on Java and will run on any operating system with an installed Java Runtime Environment (from Java 1.6 onwards).
Login

Upon launching the application you will be required to enter your username and password. After entering your login details press the Enter key or klick on “Login”. Clicking on “Beenden” will exit the HyperImage Editor.
Please contact the administrator of the HyperImage Server to obtain your login credentials.
Please note that multiple users can be logged into the same project simultaneously, but the simultaneous editing of a single object by multiple users is not recommended, since this will lead to inconsistencies and, possibly, error messages.
 Selection/Creation of a Project
After logging in you will be presented with a list of projects to which you have access. Select the project you wish to edit and click on “OK”. Select the cancel-symbol will exit the HyperImage Editor. If you are a member of only one project then you will automatically be logged into that project.
New projects can only be created by the HyperImage Server administrator.
Test Project (Project Sandbox)
You can gather your own experiences (regardless of whether you are a member of a project) and test out the editor. A test project has been created for this purpose, which you can use with the appropriate login. Please contact the administrator of the HyperImage server for the login credentials.
Please bear in mind that the test project is also used by other users. Therefore, there is a possibility that any test data you have entered may be changed by the other users.
Editor Elements
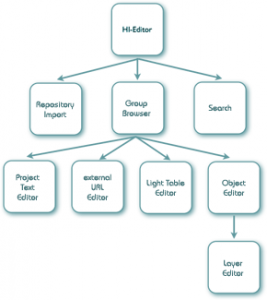
 The HyperImage Editor has six main components, each of which can be opened in a new window:
- Group Browser
- Search
- Repository Import
- Text Editor
- Light Table Editor
- External URL Editor
- Object Editor
- Layer Editor
Increasing familiarity with elements of the editor will hopefully lead you to discover new possibilities for and aspects of scholarly reasoning. We hope we can support you in your work with the editor.
