Note: HyperImage 3 is currently being developed (Beta Version). The functionality and features of the system might change until the general release. This manual will be updated from time to time to reflect the current feature set and functionality.
Introduction · What’s New · Menu Bar · Group Browser · Text Editor · External URL ·
Object Editor · Layer Editor · Tag Manager · Shortcuts
General Features
HyperImage 3 has many new functions and improvements, as well as bug fixes. This page provides an overview of the most important innovations. Additional functionality is planned.
HyperImage 3 supports current web technologies like HTML5 and Javascript and brings support for mobile devices. Progressively replacing the old Java-based solution will enable the HyperImage platform to be completely web-based.
HyperImage 3 features a live preview of the Reader publication (HI PreViewer) of your project. This way you can view what your project will look like in the Reader while still working on it in the Editor, try out different themes and make changes to your data if necessary. Changes in the Editor will immediately be visible in the preview window (WYSIWYG). This eliminates the need to constantly export your project. If you are satisfied with the result of your work you can then export your project for the HyperImage Reader and publish it as usual.
The creation and re-import of Light Tables will also be possible directly from the live preview (PreViewer) and carry over to the Editor. You do not need to ex- and re-import light tables as xml code anymore.
A plug-in architecture provides access to functionality and data supplied by external systems and allows to dynamically add features to HyperImage.
New markup options for metadata, texts and inscriptions.

The rich text metadata editor now offers further markup options. In addition to “bold”, “cursive”, “underlined” and “text as link”, it is now possible to input super- and subscripts. This can be particularly useful for creating footnotes.
![]() It is now also possible to input HTML or JavaScript as well as preformatted text via the “MarkUp” button. This represents a quantum leap for the composition of HyperImage publications. MarkUp sections in the publication are passed directly to the web browser for processing. The results can be viewed in the PreViewer or Reader. MarkUp can be input or archived via HyperImage’s im- and export functionality.
It is now also possible to input HTML or JavaScript as well as preformatted text via the “MarkUp” button. This represents a quantum leap for the composition of HyperImage publications. MarkUp sections in the publication are passed directly to the web browser for processing. The results can be viewed in the PreViewer or Reader. MarkUp can be input or archived via HyperImage’s im- and export functionality.
Support for Tags
![]() With HyperImage 3 you can add tags to any project element (objects, views, inscriptions, layers, texts, URLs, light tables, groups). Tag names are internationalised and can be assigned in every project language.
With HyperImage 3 you can add tags to any project element (objects, views, inscriptions, layers, texts, URLs, light tables, groups). Tag names are internationalised and can be assigned in every project language.
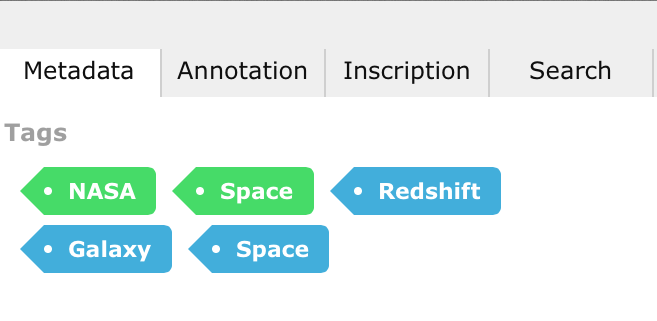 Tags are displayed in HyperImage publications, as well as in the live preview. Clicking on a tag displays all elements assigned to that particular tag.
Your HyperImage project is now enriched with new labelling and navigation capabilities.
Further information regarding tags can be found in the chapter “Tag Manager” in the online user manual.
Menu
Meni Item “Project”
Export / Backup…
 To activate this menu item select “Project” > “Export” from the toolbar or enter ⌘E (STRG+E) via the keyboard. The default export uses the PeTAL 3.0 format.
The current format is PeTAL 3.0. It supports UUIDs and Timestamps, as well as incremental imports.
PeTAL 2.0 offers backward compatibility to Hypelmage 2, but will no longer be supported in future versions.
Publication Tool

To publish a project, select “Project” > “Create HI-Reader Publication…”. The HyperImage Publication Tool opens in a web browser and allows you to select the options for the static publication of your project. You may determine the menu order for metadata, groups, texts and light tables as well as set the visibility for individual groups, texts or light tables.
Clicking on “Create Publication” generates a ZIP archive containing all the necessary data, which can then be saved to your computer. The intermediate steps involving the PostPetalGenerator are no longer required to publish a project.
Manage Project Settings
 Used Storage
Projects may be subject to an image data storage quota. The current storage usage on the server can be viewed in the project settings.
Import…

Projects in the PeTAL 2.0, PeTAL 3.0 or VRA Core 4 formats can be imported. In the case of PeTAL 3.0 and VRA, data can be imported incrementally. Projects must no longer be empty for an import to succeed. Images referenced (via href) in the VRA are retrieved automatically. Should the project already contain the images, then just the metadata is updated.
Layer Editor
Zoom
The zoom factor can be controlled with the zoom slider (to the left of the image) or via the mousewheel.
Image Scrolling
Test the new intuitive scroll function by moving the mouse cursor on the image while pressing the right mouse button.
Create Polygons with various Drawing Modes
You can create new polygons by selecting a Drawing Mode from the button bar to the left of the image. The mouse cursor changes when a drawing mode is selected.
![]() You can select from “New Freehand Polygon”, “New Flowing Freehand Polygon”, “New Rectangle”, “New Circle”, “New Arrow” or “Layer Isolation Mode”.
You can select from “New Freehand Polygon”, “New Flowing Freehand Polygon”, “New Rectangle”, “New Circle”, “New Arrow” or “Layer Isolation Mode”.
Note: If the current view does not yet contain any layers, then a new layer will be created automatically when a drawing mode is activated.
New Freeform Polygon
![]() Move the start point by hovering over the point with the mouse until the cursor changes to move-mode. You can move the point by click-dragging to the new location and releasing the mouse button. Clicking on the image sets the subsequent points, which are automatically joined to form a polygon. Finalise the polygon by hovering over the start point with the mouse cursor and clicking when it changes to the close-mode.
Move the start point by hovering over the point with the mouse until the cursor changes to move-mode. You can move the point by click-dragging to the new location and releasing the mouse button. Clicking on the image sets the subsequent points, which are automatically joined to form a polygon. Finalise the polygon by hovering over the start point with the mouse cursor and clicking when it changes to the close-mode.
New Flowing Freeform Polygon
![]() Select this mode if you wish to draw polygons in one go without the mouse (i.e. freehand). Just keep the mouse button pressed and draw the desired shape with the pen. The points are set automatically when moving the mouse.
Select this mode if you wish to draw polygons in one go without the mouse (i.e. freehand). Just keep the mouse button pressed and draw the desired shape with the pen. The points are set automatically when moving the mouse.
New Rectangle
![]() Creates a rectangle whose size can be adjusted.
Creates a rectangle whose size can be adjusted.
New Circle
![]() Creates a circle whose size can be adjusted.
Creates a circle whose size can be adjusted.
New Arrow
![]() Creates an arrow whose size can be adjusted.
Creates an arrow whose size can be adjusted.
Layer Isolation Mode
![]() Clicking on this button hides all other layers, leaving only the currently selected layer visible. A stacked layer can thus be edited without affecting the other layers.
Clicking on this button hides all other layers, leaving only the currently selected layer visible. A stacked layer can thus be edited without affecting the other layers.
Rotate Polygons
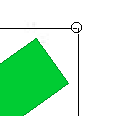 You can rotate polygons by clicking the mouse button on the top right corner of the polygonal frame, holding the mouse button while moving the cursor left or right.